I get excited opening my closet. Not my bedroom closet, ugh, damn its messy. That later. I currently am excited when I open my coat closet. That was not so last week, in fact I was super annoyed and irritated every time I opened the door. One one of the many 'sucks' of winter is having to wear scarves, gloves, hats, blah, cold, blah. We have a lot of them and I swear they were EVERYWHERE. Well one trip to Michaels and of course inspiration struck and no more. I picked up these too sweet to resist initial luggage tags for $2 a piece. An 'S' for our last name, and one for each of my kids first initials. Pair them up with some recently acquired totes from my sons room (he packed alot of his toys up and away, *sniff, sigh*) and there ya go. Instead of all of our winter gear thrown up on the shelf and falling down constantly they are now all in there own lil place. In their own pretty and fun place. Hence, I love my closet. Wednesday, March 6, 2013
Cute totes for your winter gear
Hello. Yes, I have not posted on my blog for almost a year. Yes, I am an awful person and a procrastinator. 'Nuff said.
I get excited opening my closet. Not my bedroom closet, ugh, damn its messy. That later. I currently am excited when I open my coat closet. That was not so last week, in fact I was super annoyed and irritated every time I opened the door. One one of the many 'sucks' of winter is having to wear scarves, gloves, hats, blah, cold, blah. We have a lot of them and I swear they were EVERYWHERE. Well one trip to Michaels and of course inspiration struck and no more. I picked up these too sweet to resist initial luggage tags for $2 a piece. An 'S' for our last name, and one for each of my kids first initials. Pair them up with some recently acquired totes from my sons room (he packed alot of his toys up and away, *sniff, sigh*) and there ya go. Instead of all of our winter gear thrown up on the shelf and falling down constantly they are now all in there own lil place. In their own pretty and fun place. Hence, I love my closet.
I get excited opening my closet. Not my bedroom closet, ugh, damn its messy. That later. I currently am excited when I open my coat closet. That was not so last week, in fact I was super annoyed and irritated every time I opened the door. One one of the many 'sucks' of winter is having to wear scarves, gloves, hats, blah, cold, blah. We have a lot of them and I swear they were EVERYWHERE. Well one trip to Michaels and of course inspiration struck and no more. I picked up these too sweet to resist initial luggage tags for $2 a piece. An 'S' for our last name, and one for each of my kids first initials. Pair them up with some recently acquired totes from my sons room (he packed alot of his toys up and away, *sniff, sigh*) and there ya go. Instead of all of our winter gear thrown up on the shelf and falling down constantly they are now all in there own lil place. In their own pretty and fun place. Hence, I love my closet. Tuesday, March 20, 2012
Awesome Lego Birthday Party!
My son, Chase, like just about every other nine year old in the US, LOVES Legos. They dominate his room. And the rest of the house really. Have you ever stepped on one of those in bare feet? It will make you believe death by Legos is a real thing. Well Chase of course wanted a Lego themed birthday party. It was a lot of work, but I think it turned out great. I was of course an over achiever so there is a couple things I wanted to do that I didnt end up acomplishing, but the party was a great success and most important, Chase loved it!
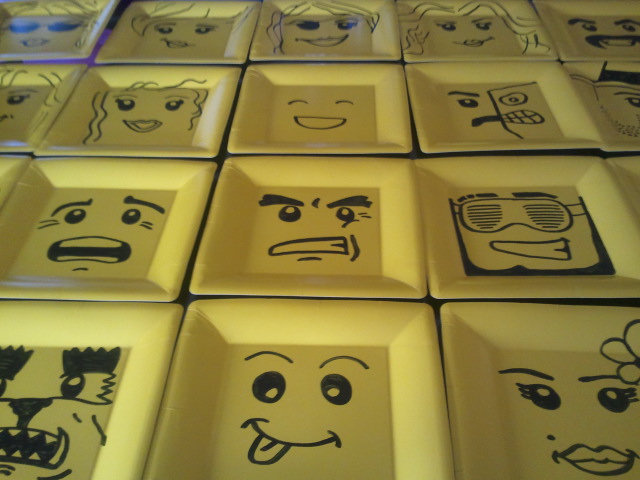
I would say the funnest thing I did for the party was the Lego plates. I just bought plain yellow square paper plates at Party City. I looked up 'Lego Faces' on Google Images and voila. Tons of faces to choose to draw on them with a fat black marker. It was honestly really fun. I tried to use Sharpie brand markers at first but there must be something not compatible with those and these plates. The black wasnt consistent and would swipe itself away. A good ol Paper Mate black permanent marker worked fabulous. Used it on every plate and the foam board seem above. They were so fun to draw!I started simple but then ended up going crazy drawing Lego Wolfmen, Two Face from Batman, etc...
The girls were the funnest but the hardest to draw, purely because there is not a ton of female Lego faces out there. There is the new line of Lego Friends for girls that are cute, but they do not have the same look as original Lego mini-fig faces. So I had to take the basic female eyes and mouth and make a few up as I went along. Kinda fun that way anyway!
My sons favorites, of course this one, designed to look like him!
Another one of the kids favorites.
Lego Indiana Jones! Sigh, if only Harrison Ford had reallly been at the party.....
Making the Lego cake pops was definitely a bit of a challange. Mostly because I didnt have perfect cookie cutters to use as a shaper for the pops themselves. For the squares I put all the cake pop mix into a square metal baking pan and firmed it down as well as I could. I then let it cool and firm up in the fridge like that and cut out squares with a knife. I am sure there is a better way of doing this that would produce more angular square edges, but hey, this worked for me without having a cookie cutter supply store right next door. So they turned out pretty well. I just put the remaining candy coating into a Make N Mold squirt bottle and squeezed out VERY little dots on top of the cake pop squares for the Lego square look. Worked pretty good, very easy. Comes out so fast you dont even need to squeeze it!
As for the Lego Mini-Fig heads, they were definitely more on the difficult side. I looked all over town for something to use as a mold for the head shape. Nada. Couldnt find a thing. Not that I went to an actual cake supply store. That would have been too smart. Besides, as I was sitting in my living room picking up my daughters toys, I came across this lil guy in the picture. Gave it a good look and realized it was the exact shape of a Lego Head, top and all. So I lubbed up the inside of that baby good with Pam and shoved some cake pop batter in. Worked great. They were a little wider and shorter that I would have liked but I used my hands to shape em up right.
Now after I started dipping these things in the coating I discovered they were WAY too big and heavy for the dipping stick to handle well. I managed to get them all on there and only dropped one off the stick into the candy coating (dont worry, I saved him!) but next time, I am going to search every corner of this earth for a smalled but similar device to mold with. I ended up using black icing for their faces again because once again the edible ink pens would not work on the candy coating. I am going to start ordering it online instead of buying it in stores. See if the quality is better. But the smiles turned out ok. I wouldnt recomend em for traveling anywhere because a lot of the dang faces touched each other and smeared on the way to the party location, but looks and works great if you are serving them the same place you made them. A few faces survivied and they looked and most importantly tasted great!
I ordered these Lego molds from Amazon.com and they were AWESOME. I love them, going to make Lego candies and gummies just for no reason all the time now! Its so easy. The plastic one makes larger and thinner Lego shapped pieces and the silicone ones make the more exact sized Lego pieces and perfect Lego Mini Figures. Easy as pie on the chocolates, just melt the candy coating and pour it in. Sit it in the fridge. That is it. Easy as pie. Or shall we say easy as chocolate pie. Now the Lego gummies are easy too but take just a bit more time. All you need to fill up both of the silicone molds is one box of jello, 2 envelopes of unflavored gelatin (its right next to the Jello at the store) and water. You pour 1/3 cup of water, the Jello, and the 2 envelopes of gelatin in a small sauce pan. Let it sit for 5-10 min together then put the pan on the stove over medium heat stirring for just 2-5min. Remove it, let it cool just one min, pour it into the molds, and pop it into the fridge. Makes some awesome gummies!
This was a very easy idea I had seen on pinterest. Just buy the basic color plain goody bags and some matching color scrapbook sheets. I used that same little toy of my daughters to draw the circles on the paper, dang that thing came in handy! It took us forever to cut them out and I so owe my friend Beth for having a few drinks with me as we cramped out scissor hands cutting those little guys out! Would have been up to 4am without her! So just tape em on the outside of the bag and voila, Lego Goody bags!
We wrapped Chase's gifts from us in basic color wrapping paper. That is one of the best things about doing a Lego themed Birthday party. Lego's are all the primary basic colors so all the supplies you need are usually the cheapest at the store because usually kids want the printed character stuff. Score for Lego! So I applied the same thing to the presents as I did the goodie bags. Taped on paper dots to give the impression of a big Lego. I also cut out some dots for a couple gift bag items that were not easily wrappable.
I found the recipe for Yoda Soda online. Not really exsclusively for Lego parties but my son is such a fan of the Lego Star Wars line and I thought it looked so fun that I printed up a label with Lego Yoda on it and there ya go, works for the Lego party. It was a HUGE hit with the kids. There were some more complicated recipes on the net but the one I chose was just Sprite and Lime Sherbert. Its very cool, you just put a scoop into the bottom of the cup and pour in the Sprite. It bubbles and kinda froths up and the lime color kinda glows through. The kids loved it, they all asked for seconds!All in all it was a great party. I really enjoyed making all the stuff for it, it was a lot of work but Chase and the other kids really loved it as you can see below!
![]() |
| The party table graced by Lego Cake Pops |
![]() |
| The kids made a big to do about picking out which plate would be theirs. |
![]() |
| Im very happy I made all the girl plates, they were all about those. |
![]() |
| LOL I made a TON of plates! Didnt want the parents to be left out, they need a Lego plate too! |
![]() |
| Mr Cake Pop Man |
![]() |
| Thats Chase Face for Yes Mom, the party rocks |
Wednesday, February 15, 2012
Love Day Cake Pops!
Sunday, February 5, 2012
Super Bowl Football Pops!
Ok totally just winged these. Or maybe I should say punted them. Ha. Ha. So funny I am. I just saw a picture of these, by Bakerella in her Cake Pop book, but it was a blurb on using different ingredients to make your pops, not the instructions for the football pops. So, this is how I went with it, guessed, and they turned out pretty ok! They will definitely go good with our baked wings! Go Giants! Bring on the commercials!
I basically followed along with the cake balls recipe in the book. Ive previously only made cake pops on a stick before and although that sounds harder, I found it to be easier. However that is probably due to the shape of the footballs. If they were round like an average cake ball, it probably would be much easier. I used Sugar Free cake mix this time, woo hoo, Im healthy. Not really because I used triple chocolate fudge frosting. Oops! I was also super excited to use my new cool green mixing spinner thing that I am sure had a technical name. Whisp! Thats it. Thank you Mommy.
So I did my best to mold them into football shapes by hand. That wasnt too very difficult, I did fail to make them all uniform in size though. I usually use an ice cream scoop for that purpose and I did start to do that here too, but decided to vary the sizes to see what size worked best for dipping the footballs. Yeah, it didnt matter. So now I have big ones and some lil ones. It works.
Basically all I did after that was dip them in the chocolate candy coating. I just sat them all the way down in the chocolate, spun them till they were all covered them picked them up with a large fork so the extra chocolate could run off. I used a large spoon to hold it stable while I kinda tilted it sideways to help with the run off. After I placed them on the wax paper I took a toothpick and traced along the bottom of the football to stop any run off from solidifying to the paper. It worked pretty good! I then used frosting to make the laces. I will not do this next time. I will use white candy coating. It ran too much, it was a pain. But easily wiped off and redrawn so there is that. Either way, I am happy with em! They're definitely not a perfect touchdown, but a solid field goal for the win! Im corney.
I basically followed along with the cake balls recipe in the book. Ive previously only made cake pops on a stick before and although that sounds harder, I found it to be easier. However that is probably due to the shape of the footballs. If they were round like an average cake ball, it probably would be much easier. I used Sugar Free cake mix this time, woo hoo, Im healthy. Not really because I used triple chocolate fudge frosting. Oops! I was also super excited to use my new cool green mixing spinner thing that I am sure had a technical name. Whisp! Thats it. Thank you Mommy. So I did my best to mold them into football shapes by hand. That wasnt too very difficult, I did fail to make them all uniform in size though. I usually use an ice cream scoop for that purpose and I did start to do that here too, but decided to vary the sizes to see what size worked best for dipping the footballs. Yeah, it didnt matter. So now I have big ones and some lil ones. It works.
Basically all I did after that was dip them in the chocolate candy coating. I just sat them all the way down in the chocolate, spun them till they were all covered them picked them up with a large fork so the extra chocolate could run off. I used a large spoon to hold it stable while I kinda tilted it sideways to help with the run off. After I placed them on the wax paper I took a toothpick and traced along the bottom of the football to stop any run off from solidifying to the paper. It worked pretty good! I then used frosting to make the laces. I will not do this next time. I will use white candy coating. It ran too much, it was a pain. But easily wiped off and redrawn so there is that. Either way, I am happy with em! They're definitely not a perfect touchdown, but a solid field goal for the win! Im corney.Thursday, December 8, 2011
Christmas Decor!
I love to decorate for Christmas. Its just about the only holiday that I go decor crazy over and try to transform everything in my house. This year is looking pretty good, I even managed to wrap some of the pictures on my wall to look like hanging presents. My husband looked at me while I was crazy and my son asked me who's present that was hanging on the wall. I eventually forced them both to admit they thought it looked pretty darn good. Whether they really thought that with their boy minds or not. Im off on a tangent here. What I am trying to tell you is I picked up some new very easy, very cute ideas from pinterest this year that you can totally pull off too!
Fancy up your windows with some candy cane! Doesnt take much, just loop some Christmas colored ribbon around those yummy treats and tie em up onto your curtain rod in a bow. Or you can always throw some garland up there too!
Same idea found here on Fresh Poppy Design, but with beautiful ornaments. Thought of staggering them myself, mixing it up with both ornaments and candy canes!
This is such an easy great idea I found here on pinterest. You can get these vases practically anywhere, although I am partial to TJ Max. They have tons and I usually pick them up for $5-$10. Grab some ornaments and some floating candles, a lil H2O and voila!
Ever seen those ugly faux plastic pears? Ever dream they could look like this!? All it takes is a lil silver, or any color you like, glittery spray paint and you have some seriously bling Christmas decor!
Fancy up your windows with some candy cane! Doesnt take much, just loop some Christmas colored ribbon around those yummy treats and tie em up onto your curtain rod in a bow. Or you can always throw some garland up there too!
Same idea found here on Fresh Poppy Design, but with beautiful ornaments. Thought of staggering them myself, mixing it up with both ornaments and candy canes!
This is such an easy great idea I found here on pinterest. You can get these vases practically anywhere, although I am partial to TJ Max. They have tons and I usually pick them up for $5-$10. Grab some ornaments and some floating candles, a lil H2O and voila!
Ever seen those ugly faux plastic pears? Ever dream they could look like this!? All it takes is a lil silver, or any color you like, glittery spray paint and you have some seriously bling Christmas decor!
Thursday, November 17, 2011
You, yes you, can make your own rediculous easy window valance
Ok if your me, you can't sew. Not even remotely. In fact I guarantee you can sew exponentialy better than I can and that's if you can repair a button. I'm useless. That why, when I ran across this on Pinterest I immediatly had to check it out. The writer of 'inmyownstyle.com' is a genius with these valances. Is a no sew, easy application. Do I think it will last forever? No. Will it last long enough till I would have got the itch to make a new one with a new pattern anyway? Yes. I believe my Mom and I will be following her instruction and trying this this weekend, I'll let you know how it turns out! Click the link below to try it yourself and definitely let me know how awesome it looks!
Monday, November 14, 2011
Your Love is Famous....
...Well it is to you. I found the cutest thing on Pinterest the other day. It is my inspiration in so many things from decor to food. This I just couldnt pass up and it was so easy. You can totally do this at home with something as easy as Microsoft Publisher. The hard part was choosing my celebrity and fictional loves! I spent forever trying to come up with the perfect ones. I could have just copied exactly the famous lovers you see here in the picture of my inspiration, but I wanted it to be more personalized to me. The people I think of when I think of famous loves and for me Lennon and Ono just aren't it. And Im pretty sure Hansel and Gretel were brother and sister. Thats weird.
So of course, I made my own. I got everyone from Bacall & Bogart to Johnny & Baby to Ron & Hermoine. Yes, I put a Harry Potter charachter on my Love Picture. And you can choose your own favorite couples to put on yours and make one too! Or I can make one for you. If you want to do it, I recomend using Microsoft Publisher, its a better choice than Word. Choose the colors you want to use, and create each couples names in a Word Art. Make some larger than others, which will naturally happen on shorter names. You dont have to change the size usually for the longer names, it will do that for you. Then just make yours in the middle, slightly larger and the others and in your chosen color. Print it up and chose a nice frame and voila! It comes out looking great! Ive never seen one of these in someone elses house, so if you take the time to make one, you will have something truley unique.
So of course after I did this, I wanted to do more. I started thinking, I want to include this on my family pictures wall I have in the works. So I need the whole family included. Ava and Chase should definitely be included in the company of the coolest siblings ever! So I made one for them too. This one was a lot more difficult. It is dang hard to come up with a bunch of famous siblings, real or fictional. And Im not including a Kardashian! Or a Brady! Chase actually helped on some, he thought it was really cool and insisted on having brother and sister Carley and Spencer Shay included from his favorite show iCarley. I cant wait to print these up and get them framed. I havent dont it yet because as I said I want to put them on my family picture wall I'm planning and I dont have it all ready and planned out yet. But they will definitely be gracing my living room walls and I cant wait to make some more for my lovely friends and family members!
So of course, I made my own. I got everyone from Bacall & Bogart to Johnny & Baby to Ron & Hermoine. Yes, I put a Harry Potter charachter on my Love Picture. And you can choose your own favorite couples to put on yours and make one too! Or I can make one for you. If you want to do it, I recomend using Microsoft Publisher, its a better choice than Word. Choose the colors you want to use, and create each couples names in a Word Art. Make some larger than others, which will naturally happen on shorter names. You dont have to change the size usually for the longer names, it will do that for you. Then just make yours in the middle, slightly larger and the others and in your chosen color. Print it up and chose a nice frame and voila! It comes out looking great! Ive never seen one of these in someone elses house, so if you take the time to make one, you will have something truley unique.
So of course after I did this, I wanted to do more. I started thinking, I want to include this on my family pictures wall I have in the works. So I need the whole family included. Ava and Chase should definitely be included in the company of the coolest siblings ever! So I made one for them too. This one was a lot more difficult. It is dang hard to come up with a bunch of famous siblings, real or fictional. And Im not including a Kardashian! Or a Brady! Chase actually helped on some, he thought it was really cool and insisted on having brother and sister Carley and Spencer Shay included from his favorite show iCarley. I cant wait to print these up and get them framed. I havent dont it yet because as I said I want to put them on my family picture wall I'm planning and I dont have it all ready and planned out yet. But they will definitely be gracing my living room walls and I cant wait to make some more for my lovely friends and family members!
Subscribe to:
Posts (Atom)